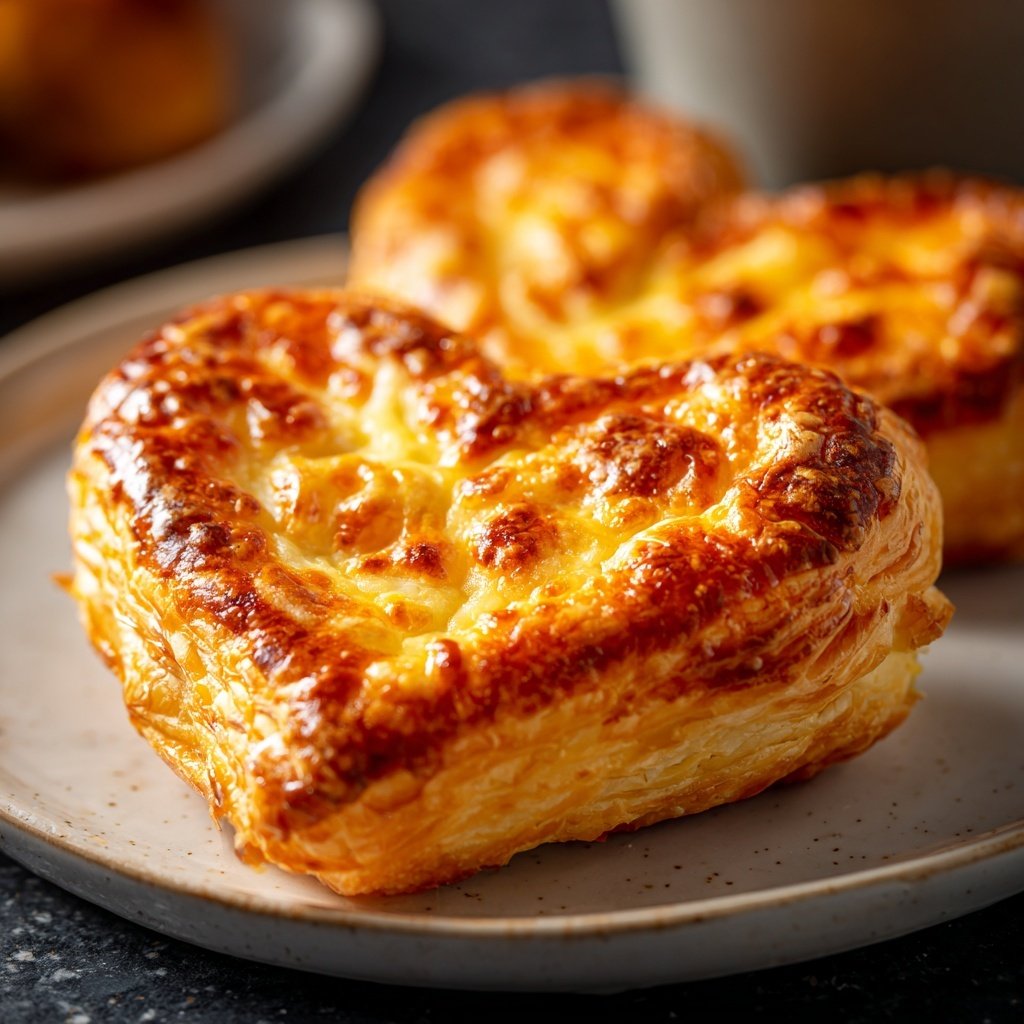
Heart-Shaped Puff Pastry with Cheese
Highlighted under: Oven Food
I absolutely adore these heart-shaped puff pastries filled with cheese! The flaky pastry combined with gooey melted cheese creates a delightful bite that is perfect for any occasion. I love how simple yet elegant they are, making them an ideal addition to a romantic dinner or a fun gathering with friends. Plus, the heart shape adds a charming touch that’s sure to impress. Every time I make these, I find myself savoring each one, and I hope you enjoy them just as much as I do!

When I first started experimenting with puff pastry, I never imagined I could create something so beautiful and tasty. The fluffy texture and buttery flavor of the pastry compliment the rich cheesiness of the filling perfectly. I remember the first time I made these heart-shaped delights for a gathering—the smiles on my friends' faces were priceless!
One key tip I discovered is that chilling the pastry before cutting it into heart shapes helps maintain its flakiness during baking. Since then, I've consistently achieved that perfect puff! The combination of shapes and flavors makes these pastries a standout dish, whether it's for a special date or a cozy night in.
Why You'll Love This Recipe
- Flaky and buttery texture that's irresistible
- Cheese filling that melts in your mouth
- Perfect for sharing at romantic dinners or parties
Mastering the Puff Pastry
The key to achieving that flaky texture in puff pastry is the proper handling of the dough. When rolling out the pastry, aim to keep it as even as possible. Uneven thickness can lead to inconsistent baking, resulting in some parts being overcooked or undercooked. Be gentle, and avoid applying too much pressure, which can compress the layers that create the puffing effect. If your pastry feels too warm, pop it back in the fridge for a few minutes to firm up before cutting.
When cutting out heart shapes, try to minimize the amount of dough scraps to avoid wasting any pastry. You can reroll the scraps to cut more shapes, but doing so too many times can make the dough tough. Instead, consider using smaller heart-shaped cutters for a few extra bites, or if you have a large heart shape, expand the openings with your knife to create unique designs. This adds a creative touch without compromising the quality.
Perfecting Your Cheese Filling
The cheese filling's success lies in the combination and balance of textures and flavors. The mozzarella offers a stretchy, gooey quality when melted, while the ricotta contributes creaminess and richness. If you prefer a sharper flavor, you could substitute part of the mozzarella with aged cheddar or even a tangy goat cheese. Remember to taste your filling before sealing the pastries; this is your opportunity to adjust seasoning or add more herbs according to your preference.
To enhance the filling further, consider incorporating finely chopped sun-dried tomatoes or olives for an additional burst of flavor. If you're looking to make these pastries vegetarian, adding sautéed spinach or mushrooms can elevate the taste. Just ensure that any added ingredients are cooked and cooled before being mixed with the cheese; this prevents excess moisture that can lead to soggy pastries.
Storage and Reheating Tips
If you're preparing these heart-shaped pastries in advance, you can assemble them and keep them in the refrigerator for up to 24 hours before baking. Just cover them loosely with plastic wrap to avoid drying out the pastry. For longer storage, consider freezing the unbaked pastries. Place them in a single layer in the freezer until solid, then transfer them to a freezer bag. They will last well for about a month, allowing you to bake fresh pastries anytime you desire.
When ready to bake, there's no need to thaw the frozen pastries beforehand. Simply increase the baking time by a few minutes, keeping an eye on them until they turn golden brown. For reheating leftovers, place them in a toaster oven instead of a microwave to retain that delightful flakiness. A temperature of around 350°F (175°C) for 10-15 minutes should revive them, making them crispy and delicious once again.
Ingredients
For the Pastry
- 1 sheet of puff pastry, thawed
- 1 egg, beaten (for egg wash)
For the Filling
- 1 cup shredded mozzarella cheese
- 1/2 cup ricotta cheese
- 1/4 teaspoon garlic powder
- Salt and pepper to taste
- Chopped fresh herbs (optional, for flavor)
Instructions
Directions
Prepare the Filling
In a mixing bowl, combine the mozzarella cheese, ricotta cheese, garlic powder, salt, pepper, and chopped herbs if using. Mix well until all ingredients are fully incorporated.
Shape the Pastry
Preheat your oven to 400°F (200°C). Roll out the puff pastry on a lightly floured surface. Using a heart-shaped cookie cutter, cut out heart shapes and place them on a lined baking sheet.
Add the Filling
Place a tablespoon of the cheese filling in the center of half of the heart shapes. Brush the edges with the beaten egg before placing another heart shape on top and pressing the edges to seal.
Bake
Brush the tops of the pastries with the remaining beaten egg. Bake in the preheated oven for 15 minutes or until golden brown. Allow them to cool slightly before serving.
Enjoy your heart-shaped puff pastries warm, either as appetizers or a scrumptious snack!
Pro Tips
- For an extra touch, you can sprinkle some grated Parmesan cheese on top before baking for added flavor.
Creative Serving Ideas
These heart-shaped puff pastries are versatile and can be served as an appetizer, side dish, or even a fun snack. Pair them with a fresh salad for a light meal or serve them alongside a warm tomato sauce or marinara for dipping. This adds an interactive element and enhances flavors with a burst of acidity. For a romantic meal, plate them on a heart-shaped dish, complementing the theme with additional decorative herbs or edible flowers.
When hosting a gathering, consider serving a variety of fillings to cater to different tastes. You could prepare one batch filled with cheese and herbs and another with spinach and feta, giving guests a chance to sample different flavors. This also makes the presentation more vibrant and inviting. A platter with assorted pastries leads to engaging conversations and endless enjoyment!
Troubleshooting Common Issues
If your heart-shaped pastries don't puff up as expected, it could be due to insufficient heat or the dough not being cold enough during baking. Ensure your oven is fully preheated before placing the pastries inside, as this immediate heat is crucial for creating steam that lifts the layers. Additionally, if the puff pastry becomes too warm while assembling, the layers will stick together, hindering puffing. If this happens, chill them in the freezer for 10-15 minutes before baking.
For those times when pastries leak filling, make sure you've sealed the edges well. Press them firmly with a fork or your fingers after brushing the edges with the egg wash. If you notice any ruptures after baking, don't fret! Simply trim away the excess pastry and serve the pastries on a decorative plate, allowing the filling to spill out can actually add a rustic charm to your presentation.
Questions About Recipes
→ Can I use other types of cheese?
Absolutely! Feel free to mix and match cheeses according to your preference.
→ How do I store leftover pastries?
Store them in an airtight container in the fridge for up to 2 days. Reheat in the oven for freshness.
→ Can I make these in advance?
Yes! You can assemble the pastries a few hours before and keep them in the fridge until ready to bake.
→ What can I serve with these pastries?
They pair wonderfully with a light salad or a side of marinara sauce for dipping.
Heart-Shaped Puff Pastry with Cheese
What You'll Need
For the Pastry
- 1 sheet of puff pastry, thawed
- 1 egg, beaten (for egg wash)
For the Filling
- 1 cup shredded mozzarella cheese
- 1/2 cup ricotta cheese
- 1/4 teaspoon garlic powder
- Salt and pepper to taste
- Chopped fresh herbs (optional, for flavor)
How-To Steps
In a mixing bowl, combine the mozzarella cheese, ricotta cheese, garlic powder, salt, pepper, and chopped herbs if using. Mix well until all ingredients are fully incorporated.
Preheat your oven to 400°F (200°C). Roll out the puff pastry on a lightly floured surface. Using a heart-shaped cookie cutter, cut out heart shapes and place them on a lined baking sheet.
Place a tablespoon of the cheese filling in the center of half of the heart shapes. Brush the edges with the beaten egg before placing another heart shape on top and pressing the edges to seal.
Brush the tops of the pastries with the remaining beaten egg. Bake in the preheated oven for 15 minutes or until golden brown. Allow them to cool slightly before serving.
Extra Tips
- For an extra touch, you can sprinkle some grated Parmesan cheese on top before baking for added flavor.
Nutritional Breakdown (Per Serving)
- Calories: 140 kcal
- Total Fat: 8g
- Saturated Fat: 4g
- Cholesterol: 30mg
- Sodium: 150mg
- Total Carbohydrates: 13g
- Dietary Fiber: 0g
- Sugars: 1g
- Protein: 4g